2022. 10. 18. 18:48ㆍTIL/Django
이 글은 [Django] Channels 사용하기 - 1에서 이어집니다.
room view 추가
특정 채팅방에서 게시된 메세지를 볼 수 있는 room view를 추가하도록 하자.
chat/templates/chat/room.html파일을 추가하자.
chat/
    __init__.py
    templates/
        chat/
            index.html
            room.html
    urls.py
    views.py
그리고 해당 파일에 다음과 같이 작성하자.
<!-- chat/templates/chat/room.html -->
<!DOCTYPE html>
<html>
<head>
    <meta charset="utf-8"/>
    <title>Chat Room</title>
</head>
<body>
    <textarea id="chat-log" cols="100" rows="20"></textarea><br>
    <input id="chat-message-input" type="text" size="100"><br>
    <input id="chat-message-submit" type="button" value="Send">
    {{ room_name|json_script:"room-name" }}
    <script>
        const roomName = JSON.parse(document.getElementById('room-name').textContent);

        const chatSocket = new WebSocket(
            'ws://'
            + window.location.host
            + '/ws/chat/'
            + roomName
            + '/'
        );

        chatSocket.onmessage = function(e) {
            const data = JSON.parse(e.data);
            document.querySelector('#chat-log').value += (data.message + '\n');
        };

        chatSocket.onclose = function(e) {
            console.error('Chat socket closed unexpectedly');
        };

        document.querySelector('#chat-message-input').focus();
        document.querySelector('#chat-message-input').onkeyup = function(e) {
            if (e.keyCode === 13) {  // enter, return
                document.querySelector('#chat-message-submit').click();
            }
        };

        document.querySelector('#chat-message-submit').onclick = function(e) {
            const messageInputDom = document.querySelector('#chat-message-input');
            const message = messageInputDom.value;
            chatSocket.send(JSON.stringify({
                'message': message
            }));
            messageInputDom.value = '';
        };
    </script>
</body>
</html>
이제 view에서 room.html 파일을 찾아갈 수 있게 작성해 주자.
# chat/views.py
from django.shortcuts import render

def index(request):
    return render(request, "chat/index.html")

def room(request, room_name):
return render(request, "chat/room.html", {"room_name": room_name})index.html을 설정했을 때와 같이 room.html 파일에 대해서도 route를 설정해 주면 된다.
# chat/urls.py
from django.urls import path

from . import views

urlpatterns = [
    path("", views.index, name="index"),
    path("<str:room_name>/", views.room, name="room"),
]
이제 $ python3 manage.py runserver로 서버를 실행시킨 후 http://127.0.0.1:8000/chat/에 접속하여 보자.
그리고 나서, "lobby"를 입력하고 enter를 눌러보자. 그러면 다음과 같은 화면이 뜰 것이다.

여기 대화창에 "hello" 라고 입력하면 드디어 채팅방이 완ㅅㅓ.....이 되지 않는다. 당연히 웹소켓 연결이 되어있지 않기 때문이다.
room.html코드를 보면WebSocket객체를 만드는 것을 볼 수 있는데 django에서는 어떤 웹소켓 관련 프로토콜을 열어주거나 설정을 해준 것이 없다.
다시 웹페이지로 넘어와서, 개발자 도구를 켜서 console창을 보면

이렇게 WebSocket 연결에 실패했다는 에러를 볼 수 있다.
첫번 째 consumer 작성하기
Django에서 HTTP request가 들어왔을 때, 루트 URLconf에서 view 함수 목록을 참조하고 호출하여 요청을 처리한다. Channels도 비슷하다.
Channels가 WebSocket을 accept할 때, 루트 routing 구성이 consumer를 조회하고, consumer에서 여러 함수를 호출하여 event를 처리한다.
이제 /ws/chat/ROOM_NAME/이라는 path로 WebSocket연결을 시도해 보자.
chat/consumers.py 파일을 만들고 다음과 같이 작성하자.
# chat/consumers.py
import json

from channels.generic.websocket import WebsocketConsumer


class ChatConsumer(WebsocketConsumer):
def connect(self):
    self.accept()

def disconnect(self, close_code):
    pass

def receive(self, text_data):
    text_data_json = json.loads(text_data)
    message = text_data_json["message"]

    self.send(text_data=json.dumps({"message": message})
위 코드는 동기적으로 모든 연결을 WebSocket Consumer가 수락하고 해당 메시지를 동일한 클라이언트에게만 다시 에코하는 consumer일 뿐이고, broadcast하지는 않는다.
Channels는 당연하게도 비동기 consumers를 지원하지만 django의 model을 참조하는 부분에 대해서는 동시에 접근할 수 없도록 잘 조치를 취해야 한다.
이제 위에서 만든 consumer에 대해서 라우팅 구성을 해주어야 한다. 먼저 chat/routing.py파일을 만들자.
chat/
    __init__.py
    consumers.py
    routing.py
    templates/
        chat/
            index.html
            room.html
    urls.py
views.pychat/routing.py에 다음 코드를 작성하자.
# chat/routing.py
from django.urls import re_path

from . import consumers

websocket_urlpatterns = [
    re_path(r"ws/chat/(?P<room_name>\w+)/$", consumers.ChatConsumer.as_asgi()),
]as_asgi()는 기존 django에서 as_view()와 비슷하다고 보면 된다.
re_path를 사용한 이유는 공식 문서 상에서 "Please note that URLRouter nesting will not work properly with path() routes if inner routers are wrapped by additional middleware." 라고 나와있었다. 이해는 잘 가지 않아서 추후 해당 부분에 대한 공부가 더 필요하다.
이제, chat.routing모듈에서 ASGI 구성을 지정해야 한다. socket_channels/asgi.py에서 다음과 같이 추가한다.
import os

from channels.auth import AuthMiddlewareStack
from channels.routing import ProtocolTypeRouter, URLRouter
from channels.security.websocket import AllowedHostsOriginValidator
from django.core.asgi import get_asgi_application

os.environ.setdefault("DJANGO_SETTINGS_MODULE", "mysite.settings")
# Initialize Django ASGI application early to ensure the AppRegistry
# is populated before importing code that may import ORM models.
django_asgi_app = get_asgi_application()

import chat.routing

application = ProtocolTypeRouter(
    {
        "http": django_asgi_app,
        "websocket": AllowedHostsOriginValidator(
            AuthMiddlewareStack(URLRouter(chat.routing.websocket_urlpatterns))
        ),
    }
)ProtocolTypeRouter에서 먼저 어떤 프로토콜로 연결이 들어왔는지 검사하고, WebSocket 연결이라면 AuthMiddlewareStack을 통해 URLRouter로 연결된다. URLRouter는 작성한 url패턴을 기반으로 특정 consumer의 라우트 연결 HTTP path를 조사한다.
이제 /ws/chat/ROOM_NAME이 잘 작동하는지 확인해 보자. Django의 Session framework는 database를 필요로 하기 때문에 migration이 필요하다. migrate를 한 후에 서버를 실행해 보자.
$ python manage.py migrate
Operations to perform:
  Apply all migrations: admin, auth, contenttypes, sessions
Running migrations:
  Applying contenttypes.0001_initial... OK
  Applying auth.0001_initial... OK
  Applying admin.0001_initial... OK
  Applying admin.0002_logentry_remove_auto_add... OK
  Applying admin.0003_logentry_add_action_flag_choices... OK
  Applying contenttypes.0002_remove_content_type_name... OK
  Applying auth.0002_alter_permission_name_max_length... OK
  Applying auth.0003_alter_user_email_max_length... OK
  Applying auth.0004_alter_user_username_opts... OK
  Applying auth.0005_alter_user_last_login_null... OK
  Applying auth.0006_require_contenttypes_0002... OK
  Applying auth.0007_alter_validators_add_error_messages... OK
  Applying auth.0008_alter_user_username_max_length... OK
  Applying auth.0009_alter_user_last_name_max_length... OK
  Applying auth.0010_alter_group_name_max_length... OK
  Applying auth.0011_update_proxy_permissions... OK
  Applying auth.0012_alter_user_first_name_max_length... OK
  Applying sessions.0001_initial... OK
$ python manage.py runserver
이제 http://127.0.0.1:8000/chat/lobby/로 접속해 보자. 그리고 이전에는 채팅창에 아무 것도 쓰여있지 않았지만 "hello"를 입력해보면

이렇게 채팅이 나타나는 것을 알 수 있다.
그러나 다른 탭을 또 활성화 하여 똑같이 http://127.0.0.1:8000/chat/lobby/로 접속해 보면
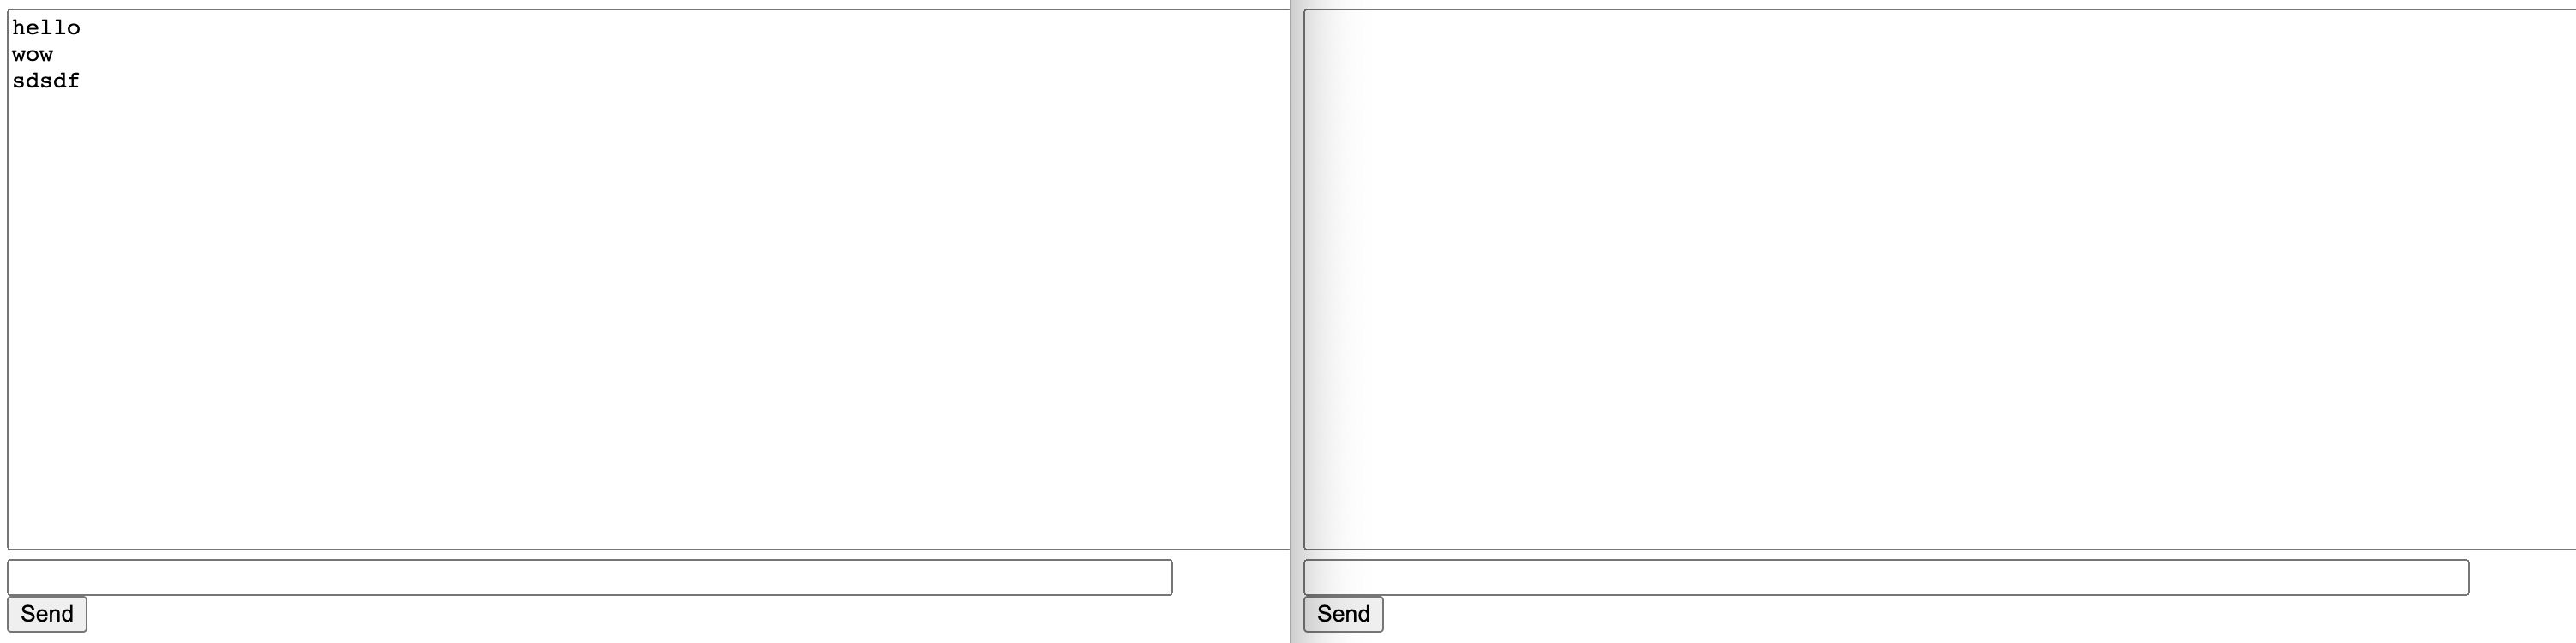
이렇게 채팅이 뜨지 않는 것을 볼 수 있다. 이게 가능하게 하려면 서로 다른 사람이 대화할 수 있게 하는 multiple instances가 필요하다.
Channels는 channel layer라는 것을 제공한다. 이것을 이용하면 consumer끼리 소통할 수 있다.
channel layer 사용하기
channel layer는 커뮤니케이션 시스템의 일종이다. 이것은 multiple consumer instances가 서로 소통할 수 있고, Django의 다른 part와도 소통할 수 있다. channel layer는 다음과 같은 추상화를 제공한다.
- channel은 메시지를 보낼 수 있는 사서함이다. 각 채널에는 이름이 있고 채널 이름이 있는 사람은 누구나 채널에 메시지를 보낼 수 있다.
- group은 관련 channel의 group이다. 그룹에도 이름이 있고 그룹 이름이 있는 사람은 이름으로 그룹에 채널을 추가/제거할 수 있고 그룹의 모든 채널에 메시지를 보낼 수 있다.
모든 consumer instance는 자동으로 고유 채널명을 생성 받고, channel layer를 통해 의사소통할 수 있다. 같은 방에 있는 여러 ChatConsumer instance가 서로 통신하기 위해서, 각 ChatConsumer는 방 이름을 기반으로 하는 그룹에 채널을 추가한다. 그럼 한 ChatConsumer가 같은 방에 있는 다른 모든 ChatConsumer에게 메시지를 전송할 수 있다.
일단 백업 저장소를 위해 Redis를 사용할 것이다.
$ docker run -p 6379:6379 -d redis:5도커가 없으면 깔아야 한다.
$ python3 -m pip install channels_redischannel layer를 사용하기 전에 설정을 먼저 해야한다. socket_channels/settings.py 파일에 다음을 추가하자.
# socket_channels/settings.py
# Channels
ASGI_APPLICATION = "socket_channels.asgi.application"

CHANNEL_LAYERS = {
    "default": {
        "BACKEND": "channels_redis.core.RedisChannelLayer",
        "CONFIG": {
            "hosts": [("127.0.0.1", 6379)],
        },
    },
}
multiple channel layers를 구성할 수 있지만 보통
defaultchannel layer 한 개만 쓴다.
이제 channel layer가 Redis와 통신할 수 있게 되었는지 확인해 보자. python shell을 열고 다음 커맨드를 입력하자.
$ python3 manage.py shell
>>> import channels.layers
>>> channel_layer = channels.layers.get_channel_layer()
>>> from asgiref.sync import async_to_sync
>>> async_to_sync(channel_layer.send)('test_channel', {'type': 'hello'})
>>> async_to_sync(channel_layer.receive)('test_channel')
{'type': 'hello'}
channel layer를 이제 ChatConsumer에 담아보자. chat/consumers.py에 작성한 코드를 아래와 같이 수정해 보자.
import json

from asgiref.sync import async_to_sync
from channels.generic.websocket import WebsocketConsumer


class ChatConsumer(WebsocketConsumer):
    def connect(self):
        """
        사용자와 WebSocket 연결이 맺어졌을 때 호출
        """
        self.room_name = self.scope["url_route"]["kwargs"]["room_name"]
        self.room_group_name = "chat_%s" % self.room_name

        # Join room group
        async_to_sync(self.channel_layer.group_add)(
            self.room_group_name, self.channel_name
        )

        self.accept()

    def disconnect(self, close_code):
        """
        사용자와 WebSocket 연결이 끊겼을 때 호출
        """
        # Leave room group
        async_to_sync(self.channel_layer.group_discard)(
            self.room_group_name, self.channel_name
        )

    # Receive message from WebSocket
    def receive(self, text_data):
        """
        사용자가 메세지를 보낼 떄 호출
        """
        text_data_json = json.loads(text_data)
        message = text_data_json["message"]

        # Send message to room group
        async_to_sync(self.channel_layer.group_send)(
            self.room_group_name, {"type": "chat_message", "message": message}
        )

    # Receive message from room group
    def chat_message(self, event):
        message = event["message"]

        # Send message to WebSocket
self.send(text_data=json.dumps({"message": message}))- 유저가 메시지를 보낼 때, JavaScript 함수는 WebSocket을 통해 메시지를
ChatConsumer에게 보낸다. ChatConsumer는 메시지를 수신하여 방 이름에 해당하는 그룹으로 메시지를 전달한다.- 같은 그룹(같은 방에 있는)의
ChatConsumer는 그룹으로부터 메시지를 받을 것이다. 그리고 WebSocket을 통해 JavaScript로 다시 전달하여 채팅 로그에 추가한다.
위의 ChatConsumer코드에 대해 더 설명하자면
self.scope["url_route"]["kwargs"]["room_name"]- consumer에게 WebSocket연결을 한
chat/routing.py에서 URL route를 통해room_name파라미터를 가져온다. - 모든 consumer는 특별한 어떤 URL 혹은 현재 인증 정보로 부터 얻는 positional 또는 keyword arguments를 포함하여 연결에 대한 scope를 가지고 있다.
- consumer에게 WebSocket연결을 한
공식 문서가 조금 어렵게 설명한 부분이 있는데, 첨언하자면, scope는 연결에 대한 정보라고 보면 된다. remote IP, username, lifetime of connection 등의 정보를 가진다.
self.room_group_name = "chat_%s" % self.room_name- 그룹 이름은 영어, 숫자, 하이픈, 밑줄 또는 마침표만 사용할 수 있다.
- 사용자가 설정한 방 이름으로 그룹 이름이 결정된다.
async_to_sync(self.channel_layer.group_add)(...)- group에 참여한다.
async_to_sync(...)래핑 함수는ChatConsumer가 동기적인 WebSocketConsumer이지만 비동기적인 channel layer method를 호출하기 때문에 필요하다.- 그룹 이름은 ASCII 영숫자, 하이픈, 마침표, 및줄로 제한되고 최대 길이는 100으로 제한된다. 여기의 코드에서는 룸 이름으로 그룹 이름이 지어지기 때문에 룸 이름도 이 규칙에 맞춰 지어야 한다.
self.accept()- WebSocket 연결을 받아들인다.
connect()메서드 내에서accept()함수를 호출하지 않으면 연결이 거부되고 종료된다.- 예를 들면, 연결된 유저가 인증이 되어있지 않거나 권한이 없으면
accept()함수를 호출하지 않고 거부할 수 있다. - 연결을 받아들이기러 했으면
accept()함수는 가장 마지막에 호출하는 것이 좋다.
async_to_sync(self.channel_layer.group_discard)(...)- 그룹을 나간다.
async_to_sync(self.channel_layer.group_send)- 그룹에게 event를 보낸다.
- event에는 event를 수신하는 consumer측에서 어떤 행동을 취해야할 지 알려주는
type이라는 키가 존재한다.
이제 다시 서버를 실행하고 제대로 동작하는 지 확인해 보자.
$ python3 manage.py runserver잘 동작하는 것을 확인할 수 있다.
'TIL > Django' 카테고리의 다른 글
| [Django] Channels 사용하기 - 4 (0) | 2022.10.24 |
|---|---|
| [Django] Channels 사용하기 - 3 (0) | 2022.10.24 |
| [Django] Channels 사용하기 - 1 (3) | 2022.10.17 |
| [Django] connection.queries always empty (0) | 2022.10.13 |
| [Django] DRF란? (0) | 2022.10.12 |